React重构案例

React组件重构:嵌套+继承 与 高阶组件

2018-07-09 11:336047029

前言

在最近做的一个react项目中,遇到了一个比较典型的需要重构的场景:提取两个组件中共同的部分。

最开始通过使用嵌套组件和继承的方式完成了这次重构。

但是后来又用高阶组件重新写了一遍,发现更好一点。

在这里记录下这两种方式以便之后参考和演进。

本次重构的场景

因为场景涉及到具体的业务,所以我现在将它简化为一个简单的场景。

现在有两个黑色箱子,箱子上都有一个红色按钮,A箱子充满气体,按了按钮之后箱子里面气体变红,B箱子充满泥土,按了之后箱子里面泥土变红。

那么现在上一个简单的重构前代码:

BoxA.jsx

1
2
3
4
5
6
7
8
9
10
11
12
13
14
15
16
17
18
19
20
21
22
23
24
25
26
27
28
29
30
import React, { Component, PropTypes } from 'react'

class BoxA extends Component {
state={
color:'black'
}

handleClick=()=>{
this.setState({
color:'red'
})
}

handleShake=()=>{
/* 摇动后气体没声音 */
}

render() {
return (
/* 这里面当然没有onShake这种事件,理解意思就行了 */
<div style={{backgroundColor:'black'}} onShake={this.handleShake}>
<button onClick={this.handleClick} style={{backgroundColor:'red'}}> </button>
<div>
/* 气体组件,没毛病 */
<气体 color={this.state.color} />
</div>
</div>
)
}
}

BoxB.jsx

1
2
3
4
5
6
7
8
9
10
11
12
13
14
15
16
17
18
19
20
21
22
23
24
25
26
27
import React, { Component, PropTypes } from 'react'

class BoxB extends Component {
state={
color:'black'
}
handleClick=()=>{
this.setState({
color:'red'
})
}

handleShake=()=>{
/* 摇动后泥土有声音 */
}

render() {
return (
<div style={{backgroundColor:'black'}} onShake={this.handleShake}>
<button onClick={this.handleClick} style={{backgroundColor:'red'}}></button>
<div>
<泥土 color={this.state.color} />
</div>
</div>
)
}
}

使用嵌套组件进行重构

看看上面的代码,即使在业务简化的情况下都有很多重复的,所以得重构。

对于这种很明显的箱子类问题,一般都会采用嵌套组件的方式重构。

Box.jsx

1
2
3
4
5
6
7
8
9
10
11
12
13
14
15
16
17
18
19
20
21
import React, { Component, PropTypes } from 'react'

class Box extends Component {

static propTypes = {
children: PropTypes.node,
onClick: PropTypes.func,
onShake: PropTypes.func
}

render() {
return (
<div style={{backgroundColor:'black'}} onShake={this.props.onShake}>
<button onClick={this.props.onClick} style={{backgroundColor:'red'}}></button>
<div>
{this.children}
</div>
</div>
)
}
}

BoxA.jsx

1
2
3
4
5
6
7
8
9
10
11
12
13
14
15
16
17
18
19
20
21
22
23
24
25
26
import React, { Component, PropTypes } from 'react'
import Box from './Box.jsx'

class BoxA extends Component {
state={
color:'black'
}

handleClick=()=>{
this.setState({
color:'red'
})
}

handleShake=()=>{
/* 摇动后气体没声音 */
}

render() {
return (
<Box onClick={this.handleClick} onShake={this.props.handleShake}>
<气体 color={this.state.color} />
</Box>
)
}
}

BoxB.jsx

1
2
3
4
5
6
7
8
9
10
11
12
13
14
15
16
17
18
19
20
21
22
23
24
import React, { Component, PropTypes } from 'react'

class BoxB extends Component {
state={
color:'black'
}
handleClick=()=>{
this.setState({
color:'red'
})
}

handleShake=()=>{
/* 摇动后泥土有声音 */
}

render() {
return (
<Box onClick={this.handleClick} onShake={this.props.handleShake}>
<泥土 color={this.state.color} />
</Box>
)
}
}

使用继承组件的方式进行重构

对于很多场景而言,使用了嵌套组件后,可能就不需要或者没法进一步进行组件提炼了。

然而完成这波操作后,我们发现嵌套组件BoxA和BoxB依然存在重复代码,即按下按钮变红这部分代码。

这部分代码可以使用嵌套组件与被嵌套组件的通信机制来处理,技术上而言依然可以将这部分代码用嵌套组件的方式来解决。

但是为了保证组件的单一职责,即箱子就是个带红色按钮可以摇动的箱子,我们不知道里面以后会放什么进去,就不能说不管以后里面放什么,只要我一按红色按钮,里面的物质都会变红。

这部分代码肯定是不能放在嵌套组件Box里,因为它直接操作着被嵌套的内容。

那么在这里我们可以使用继承组件的方式。

Box.jsx

1
2
3
4
5
6
7
8
9
10
11
12
13
14
15
16
17
18
19
20
import React, { Component, PropTypes } from 'react'

class Box extends Component {
static propTypes = {
children: PropTypes.node,
onClick: PropTypes.func,
onShake: PropTypes.func
}

render() {
return (
<div style={{backgroundColor:'black'}} onShake={this.props.onShake}>
<button onClick={this.props.onClick} style={{backgroundColor:'red'}}></button>
<div>
{this.children}
</div>
</div>
)
}
}

BasicBox.jsx

1
2
3
4
5
6
7
8
9
10
11
12
import React, { Component, PropTypes } from 'react'
class BasicBox extends Component {
state={
color:'black'
}

handleClick=()=>{
this.setState({
color:'red'
})
}
}

BoxA.jsx

1
2
3
4
5
6
7
8
9
10
11
12
13
14
15
16
import React, { Component, PropTypes } from 'react'
import Box from './Box.jsx'

class BoxA extends BasicBox {
handleShake=()=>{
/* 摇动后气体没声音 */
}

render() {
return (
<Box onClick={this.handleClick} onShake={this.props.handleShake}>
<气体 color={this.state.color} />
</Box>
)
}
}

BoxB.jsx

1
2
3
4
5
6
7
8
9
10
11
12
13
14
15
import React, { Component, PropTypes } from 'react'

class BoxB extends BasicBox {
handleShake=()=>{
/* 摇动后泥土有声音 */
}

render() {
return (
<Box onClick={this.handleClick} onShake={this.props.handleShake}>
<泥土 color={this.state.color} />
</Box>
)
}
}

通过修改后的代码,就可以将BoxA和BoxB中相同的部分提取到BasicBox中。

这样我们相当于将一个功能块提取了出来,你可以继承BasicBox(这个命名可能不好,容易引起混淆),如果不使用state的值也完全没有任何问题。

但是这样做也许会带了一些别的问题。

我们自己去看这段代码的时候其实不难理解,不过之后让其他人对这块代码做修改时,后来的人就会感到奇怪,BoxA中突然间使用了一个不知道从哪里来的handleClick

使用高阶组件进行重构

为了解决上面的问题,后来又使用高阶组件的方式玩了一遍:

hocBox.jsx

1
2
3
4
5
6
7
8
9
10
11
12
13
14
15
16
17
18
19
20
21
22
23
24
25
26
27
28
29
30
import React, { Component, PropTypes } from 'react'

hocBox=(WrappedComponent)=>{
return class Box extends Component{
static propTypes = {
onShake: PropTypes.func
}

state={
color:'black'
}

handleClick=()=>{
this.setState({
color:'red'
})
}

render() {
return (
<div style={{backgroundColor:'black'}} onShake={this.props.handleShake}>
<button onClick={this.handleClick} style={{backgroundColor:'red'}}></button>
<div>
<WrappedComponent color={this.state.color} />
</div>
</div>
)
}
}
}

BoxA.jsx

1
2
3
4
5
6
7
8
9
10
11
12
13
14
15
16
import React, { Component, PropTypes } from 'react'
import Box from './hocBox.jsx'


const 气体WithBtnBox=hocBox(气体)
class BoxA extends BasicBox {
handleShake=()=>{
/* 摇动后气体没声音 */
}

render() {
return (
<气体WithBtnBox onShake={this.handleShake} />
)
}
}

BoxB.jsx

1
2
3
4
5
6
7
8
9
10
11
12
13
14
15
import React, { Component, PropTypes } from 'react'
import Box from './hocBox.jsx'

const 泥土WithBtnBox=hocBox(泥土)
class BoxA extends BasicBox {
handleShake=()=>{
/* 摇动后泥土有声音 */
}

render() {
return (
<泥土WithBtnBox onShake={this.handleShake} />
)
}
}

高阶组件的使用就像设计模式中的装饰者模式(Decorator Pattern)。

总结

以上的两种方式中,高阶组件的方式对于后来者在修改上更友好一点。

但是用嵌套+继承的方式理解起来其实更容易一点,特别是去重构一个复杂的组件时,通过这种方式往往更快,拆分起来更容易。

如何倾听不赞同的观点

  • nonverbal attending

    giving someone your full attention without speaking

    • Keep your body open to the other person
    • Maintain moderate levels of eye contact.
    • Use simple gestures to communicate to the other person that you’re listening and encouraging them to continue. Head nods are one way — just don’t do it continuously. Occasionally say “Mm-hmm” to communicate encouragement.
    • staying silent.

    理解对方/朝着Goal努力

阅读更多

Hard Example Mining

常规使用的有2种常见的困难样例挖掘(hard example mining)算法,1)用于优化SVM模型时使用 和2)对非SVM模型(存在loss)的模型使用。

  1. 在优化SVM的场景中,要维持一个训练样本工作集,训练过程在调整参数使得在工作集上收敛调整工作集两个步骤间切换。调整工作集的标准是去掉一些已经被SVM模型正确分类的样本添加一些被模型错误分类的样本。有论文已经证明这个过程最终会得到一个全局最优的SVM模型。

  2. 在非SVM模型的场景中,

    1. 训练算法开始于构造一个数据集:含有正样本数据和随机的负样本数据

    2. 再在得到的数据集上进行训练,

    3. 再将训练好的模型应用到其他未参与(未被随机选中)训练的负样本中,将判断错误的负样本数据(false positives)加入训练集

    4. 重新对模型进行训练。

      这种过程通常只迭代一次。没有证据表明这个过程最终会收敛。

在线困难样例挖掘(OHEM)算法:

img

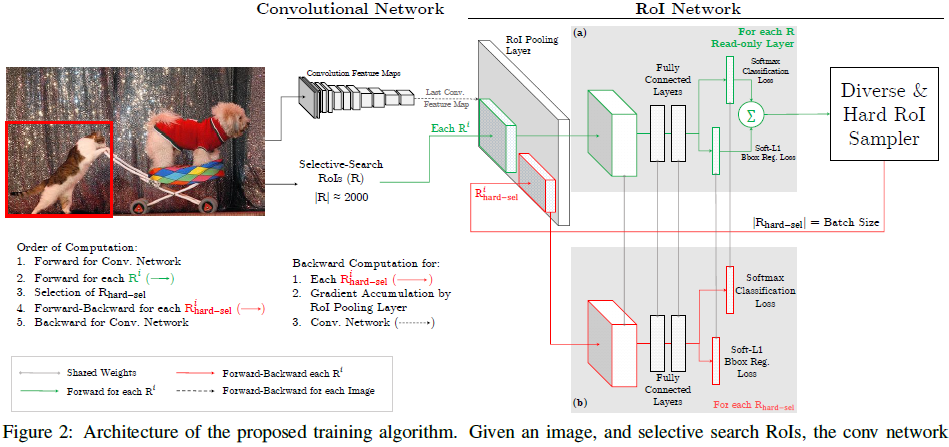
OHEM算法的核心是选择一些hard example作为训练的样本从而改善网络参数效果,hard example指的是有多样性和高损失的样本。

1
2
3
4
5
6
7
困难样例发掘(OHEM) alg: 
At SGD iteration t
1. Image ---(conv) ---> Feature Maps
2. RoIs via some selective method. 通过某种方式选择出RoIs
3. 计算RoIs的损失losses
4. 对RoIs依据losses进行排序 高loss对应着困难的RoI,从高到低选择B/N个loss最高的困难样例
5. 利用选择的困难样例对网络进行训练
  • Notes
    • 应用NMS(threshold = 0.7)来应对重叠度较高的困难样例
    • 忽略了样本类间的比例。因为如果某一类较少,它的表现就会较差,loss较大,就会被选中用于训练。
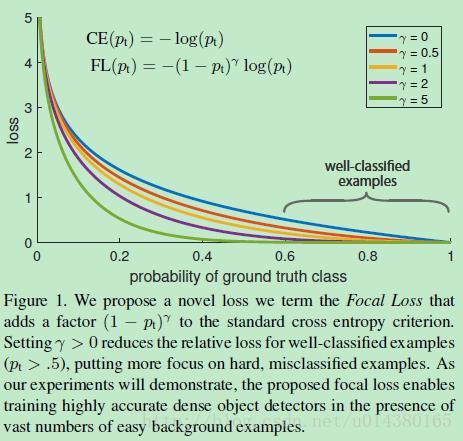
Focal Loss

根据论文作者的探查,在One-Stage Detector中由于较多的easy examples的loss之和overwhelm了hard example的loss(所以网络的学习就忽视 了hard examples)。

  1. 正负样本不均衡
  2. 正样本中easy examples vs hard examples不均衡。

所以就对困难样本loss加大权重

img